


 Posts
Posts


November is usually the start of the really chilly weather. Here are some general maintenance tasks that should be accomplished in and around the home this month.
Clean and maintain major appliances
Clean the drip pans of your electric stove, clean behind the stove, dishwasher and washer & dryer. Pull out the refrigerator and clean the coils and drip pan underneath. Wipe down the furnace, water heater and water softener. Clean around the dishwasher strainer and look for debris in the washing arm (spins and squirts water during the wash/rinse cycle)
Keep gutters clean from leaves & debris Water damage is very costly and can make your home very uncomfortable with mold and mildew, not to mention repair headaches. Some folks prefer to use a powered blower to blast debris out of the gutters.
Clean your garbage disposal
Clean and deodorize your in-sink garbage disposal by packing it with ice cubes and 1/2 cup of baking soda; then turn it on. After the grinding noise stops, pour a kettle full of boiling water into the sink.
Change furnace filter
Some furnace filters are washable. Have two on hand. One in use, one cleaned and ready to install. Remove the dirty one and install the clean one. Wash and dry the dirty one for use next month.
Check operation of your sump-pump
Take the top off the sump and remove any debris that may have collected in there. Pour at least 5 gallons of water into the sump, slowly, to ensure pump is operational. Some people like to run a hose into the sump area, turn the water on to a slow rate and allow the pump to operate for about 1/2 an hour or so. Do not leave it unattended though.
Touch-up woodwork Use "Old English Scratch Remover" or matching stain to cover dents and scratches on your woodwork. Keeping up on this task at least once a year will help preserve a well maintained look to the inside of your home. It only takes a few minutes in each room to accomplish.
Turn on your Whole-House humidifier Many homes are blessed with a whole-house humidifier. If you are lucky enough to have one you should turn on the water supply and usually a manual switch near the humidifier. It is usually at the furnace. Change the water pad (filter-looking device) when there are a lot of white crusty mineral deposits on it.
If you do not have a whole-house humidifier you can hang a large towel or sheet in the shower and keep it wet. The water will evaporate and get into the air. Change out the towel or sheet often (maybe once per week) and make sure it does not get moldy.
Cover outside hose bibs (water spigots) Most new homes have the freeze-proof spigots but they can still freeze if the hose is not removed for the wintertime. This time of year ALWAYS remove the hose after each use. If you do not know if your spigots are freeze proof it won’t hurt to cover them. The foam covers only cost a few dollars to purchase and a few minutes to install. Installing one could save you thousands in repair costs and insurance claims.
Saturday, November 1, 2014
November Maintenance Tasks


Wednesday, November 14, 2012
Cleaning Secrets!
Wednesday, August 29, 2012
Cool Evenings Invite Unwanted Guests

Figuring out if you have mice
Mice aren’t smart enough to know not to attract attention to themselves, so mice will make noise and leave their marks around the house. If you listen at night, you can often hear them rustling around in your walls or ceilings.
You see small holes gnawed in bread bags or cereals and the inevitable mouse droppings left behind in drawers or even on counter tops.
If you’re not sure you have mice in your home, put some talcum powder or flour near where your think they might be and leave it for a few days (and nights). If you’ve got mice, you’ll see tiny mouse footprints tracking through the flour.
How do you get rid of your mice?
Start by getting rid of any potential food sources for mice, Clean up any spills or crumbs in cupboards and put your dry food in glass or metal containers.
Seal openings from the outside that might allow more mice to get in.
Your next step is putting out some traps to catch your uninvited guests. Old-fashioned spring traps work well and they’re inexpensive.
Place your traps along the walls where the mice move (since mice are almost blind they tend to stay close to walls). Some people suggest putting out your traps for a couple of days unset and without any bait in them, so the mice will get used to them.
Bait your traps with peanut butter or chocolate (cheese only works in the cartoons) and check them regularly.
Give the traps a couple of days and if they don’t capture any mice, relocate them to a different area.
If you just want to catch your mice to remove them, there are a number of different live traps available as well. Just remember if you do decide to use live traps, you need to check them often (at least daily), or the trapped mice will end up dying slowly in the traps. Also make sure you release your captured mice ¼ mile away from your home or they could be back inside before you are.
Keeping mice out of your house
Seal any openings you find with expanding foam insulation, caulking, metal screening or small piece of sheet metal cut to fit. Steel wool can also do a good job since mice don’t like to chew on metal, but it will rust and deteriorate and need to be replaced after a few years.
Make sure your soffits are tightly fastened. An opening in a soffit will allow mice to get into your attic and then right down into your home.
Locate compost or woodpiles well away from your house and build supports or use old pallets to get wood up off the ground. Mice could nest in them during the summer and move right on inside when the weather gets cold. It’s also a good idea to keep bird feeders well away for your house so seeds lying on the ground won’t attract mice.
Clean up any spilled grass or plant seeds in your garage and store your trash in a metal container.
Finally, clean up any pet food bowls so the mice won’t be attracted to a midnight buffet of pet food.
A couple of final thoughts
Wednesday, March 28, 2012
10 Improvements that help sell a home
Summer's approaching, people are packing and preparing to move.
 Remove clutter. Rooms packed with furniture, closets full of stuff, and garages that don’t allow a car inside all contribute to a home appearing small and cramped. Removing clutter and excess décor helps your home look larger and simplifies the eventual move once the home sells.
- Patch nail holes. Filling unsightly nail holes is an easy way to make old drywall look new. Using a spackle knife, fill in each hole with lightweight putty and scrape the excess off the walls. Wait for the putty to dry and sand the spot down until it’s smooth. Then prime and paint
- Paint the walls a warm or neutral color. While pink might be your favorite color, it’s not universally celebrated. Stick to colors that will appeal to the largest audience of buyers. A fresh coat of paint will make the house look and smell clean and new.
- Restore baseboards and trim. While little things like dinged and scuffed baseboards go overlooked by the average homeowner, they stand out to the increasingly picky consumer. Clean the smudges and scrapes off the baseboards and and paint or stain to renew. Old English works great on stained finishes.
- Consider tile flooring. Tile doesn’t hold dirt like carpet, is cool in the summer and is impervious should the kids or pets track water and dirt in. Tile floors that are lighter in color with a darker grout are most popular right now.
- Emphasize lighting. Different lighting options can influence the mood of any room, but there’s no substitute for natural lighting. One way to maximize natural lighting is to hang mirrors opposite of windows. Come nighttime, lights should emphasize decorative pieces in the room.
- Update kitchens and bathrooms. Before making major renovations, keep in mind that minor upgrades can go a long way. An easy and inexpensive way to breathe new life into a bathroom or kitchen is to replace old light fixtures, faucets and hardware with modern alternatives. A thorough cleaning, re-grouting as required, and replacement of old and mildewed caulk, will help a tub or shower look fresh and clean.
- Install a closet system. Homebuyers want plenty of storage space, and an unorganized, crowded closet won’t appeal to the masses. Anything that isn’t needed should be donated. Once the closet is empty, create a custom storage solution that maximizes space.
- Consider window upgrades. Not only will new windows make the home look more enticing, but double pane windows can save the future homeowner 25 percent on heating and cooling bills over old single pane models. Dispose of outdated drapes and bent mini-blinds and let the sunshine in.
- Improve the curb appeal. The outside of your home can make a strong first impression, and a well-maintained yard with eye-catching plants and landscaping adds elegance. Consider power washing the siding and deck, while adding a fresh coat of paint to entry doors and trim.

The number one thing home owners can do to ensure their home sells quicker than most to to keep up on the maintenance. Buyers do not want to purchase a home and spend money to accomplish years worth of neglected maintenance.
Wednesday, March 21, 2012
Spring is here! Yeah! Yeah!

Many homeowners do not realize that what is seen from the exterior of the rotted siding is the just a fraction of the damage that is truly going on with that area. The siding and/or window trim is rotting in that location due to some type of water intrusion behind those locations and will get progressively worse with a few more rain showers. It is less costly to tackle these breaches in the exterior of your home at the first sign of a problem. In discussing the escalation of the damage with homeowners most thought they would have to completely re-side their homes to complete the repairs so they were allowing it to progress and save up for the project at the same time. The best and least costly method for this repair is to replace the rotted components right away and not allow the follow-on damage to occur. In many cases this early detection and repair may net another 10-15 years of life from the siding before complete replacement is needed.
Do not allow the first sign of some rotted or swollen siding or trim fool you into thinking your only option is complete replacement. You typically do not replace your car because it has a flat tire, do you?

The best advice Mr. Handyman can give on this issue is to spend your money wisely on annual maintenance and quickly on the minor repairs and do not allow it to progress into a major project.
Be highly proactive about keeping your home repair costs down. Be more observant and respond quicker to maintenance and minor repairs. Call Mr. Handyman at the first sign of damage so we can assist you in keeping those repair costs down.
Wednesday, March 7, 2012
Daylight Savings Time Change
I always dread Daylight Saving Time changes just because it seems to take my body clock three weeks to self correct. This bi-annual event is a great reminder though, to complete a few tasks around the house that should not be overlooked.
Here are tasks that we recommend you perform each changing of the clock.
Daylight Saving Time Home Maintenance Checklist
Add a couple of drops of light weight oil (preferred: puffs of graphite powder, available at any locksmith or Ace Hardware) to all of your key locks, especially those exposed to the weather. Turn the cylinder a few times to ensure complete coverage in the throat of the lock. It's a good idea to do this to your car locks as well.
If you have an emergency escape window in the basement or an emergency escape ladder from a second story window, open them up and try them out to be sure there are no obstructions and the unit is operating properly. Make good use of the task with the family and practice your escape drill. Follow your escape plan and muster at your meeting place for the full drill.
Check your dryer vent duct work and make sure that it is clean and that there is no lint caught up in it. A laundry room fire is the #2 cause of house fires in this country. It only takes a few minutes to inspect the dryer vent duct work and about 20 minutes to clean it all out.
Performing these four quick homeowner maintenance tasks with each time change will help to keep your house in order and help keep your family safe.
Wednesday, January 18, 2012
Water Trees in Winter
We’ve enjoyed a mild, warmer winter thus far in the Omaha area but it has been very dry with very little snow and rain. There is one very glaring precaution while we have been enjoying such a mild winter….your landscape. Trees and shrubs need water to survive and the climate just has not produced.
To keep your trees and shrubs healthy this winter you will need to supplement the moisture they are not getting naturally. Break out that garden hose and allow a slow stream of water to saturate the ground for several hours in and around your trees and shrubs. The ground is frozen so it will take a long time to soak in. 4-5 hours of a mild trickle to the edges of the drip line should save the trees from winter kill. Maybe try to water 2 trees a day ensuring the whole drip line is saturated.
DO NOT forget to remove the hose from the spigot each night prior to the nightly freeze.
Most of us don’t think about the fact that trees need water during the winter. They drop their leaves and go into an apparent dormant state, so we tend to forget about them. What we don’t realize is that beneath the ground there is still plenty of activity going on. The roots continue to grow throughout the winter and need adequate water to survive.
 There are few outward signs of drought stress on deciduous trees during the winter. During months when they have leaves, drought is noticeable because of leaf yellowing, wilting, curling at edges, brown tips, and dropping leaves. During the winter though, there are no leaves to act as drought indicators. Evergreens on the other hand, may turn yellow, red or purple. They also may turn brown at the tips of the needles and the browning may progress through the needle towards the twig.
Trees should be watered to a depth of about twelve inches below the soil surface. The soil should be saturated within the drip line which is the area out to the outer edges of the trees branches. This will ensure that water is dispersed to all of the roots. On evergreens, water should be distributed 3 to 5 feet beyond the drip line on all sides of the tree.
Tuesday, January 10, 2012
Looking to Sell your home?
National syndicated columnist Liz Pullman Weston's article titled "Speed your home sale with these fast fix-ups" is a must read. Spending limited funds in the right way will make your home selling experience more enjoyable.
Read the article here:

Wednesday, December 28, 2011
CONTROLLING HOME MAINTENANE COSTS
Home repairs can break your bank. Keeping your home maintained is a less-costly way to keep ahead of the repair costs.
Experts in the home repair industry typically recommend spending 1-3 percent (per year) of the home's value on maintenance tasks alone, not considering repairs. Repair cost estimates could be 5-10 times that amount. The trick is to spend as little as possible in home repairs while you live there so you end up in a positive cash situation if/when you sell your home. The only way I know to keep repair costs down is to spend properly and efficiently on your home's seasonal maintenance tasks. As stated many times before "Spend hundred$ now in maintenance or spend thou$and$ later in repairs." It is generally about a 10:1 ratio. Spending that $100 keeping it maintained will save you thousands in future repairs.
A new year is upon us, plan to put up some of your tax return for home maintenance and add to the kitty with each paycheck. If you do not have cash on hand for some of the smaller maintenance tasks you certainly will not be able to afford the future repair costs.
 If you follow Mr. Handyman’s seasonal maintenance tips on our blog site your monthly maintenance and repairs costs will go down. If the maintenance involves tasks that you cannot complete yourself or if it requires a professional (replacing wood trim around the windows, HVAC maintenance, or properly caulking around the tub, kitchen sink or around windows) then give Mr. Handyman a call. We have the expertise and knowledge to accomplish most home maintenance tasks.
With the tightening of the money belt in today's economy and the possibility of inflation causing your hard-earned dollar to buy less in the future, saving where you can just makes great financial sense. We have offered several tips to save with energy-efficiency items on our blog site as well. Just look for a related article on the right side of the main page.
Thursday, November 10, 2011
Whole-house humidifiers can make your home more comfortable
Winter weather can be harsh outside of the home. Heating your home can remove so much moisture from the air that it can be somewhat uncomfortable. Low moisture content in the air can cause excessive static electricity, dry coughs, dry skin and can dry out your sinuses to the point of causing bloody noses. Dry air is not good for furniture, pets or people with allergies.
Getting enough moisture into the home can be a daunting task when your heater cycles on so much in the coldest parts of the winter. Room humidifiers can help maintain the moisture level in individual rooms. Requires filling daily and cleaning very often to ward off bacteria, mold and other contaminates. Usually $30-$150.
A whole-house humidifier may be your 2nd best investment for winter conditioning of your living space, right behind that heater unit itself.
What are the benefits of a whole-house humidifier?
1. Can save costs in making your home more comfortable
2. Easy annual maintenance
3. Set and forget, no bottle filling, no chemicals, whole-house coverage
4. Cost to have one installed would run $350-$700 depending on the model
If you have a whole-house humidifier you should perform the maintenance NOW
1. Turn on the water source and verify the water line is not plugged
2. Inspect the water pad (filter looking element) and replace if mineral deposits are evident
3. Turn on the switch or humidistat (thermostat looking device in main living area)
OLD HOME REMEDY TRICK
Hang a sheet or towel in the shower area and keep it wet and the shower curtain open. Moisture evaporates and gets into the air. Swap out the sheet or towel at least every week. This trick may make the coldest, driest months more comfortable.
Sunday, October 23, 2011
Keep the Chill Out! Shrink-Wrap your windows
I can attest that shrink-film does work! I have used it for several years on leaky, drafty windows. The extra layer of plastic adds another barrier to the harsh winter cold infiltrating into your home.
To have a great installation that will last throughout the winter season follow these simple guidelines.
2. Wipe off the trim where the tape will go with denatured alcohol or the alcohol pads that come with the kit.
3. When you cut and install the film onto the tape do not pull it tight, allow some sag. Make sure that the film does not bunch up
 at the tape lines though.
4. When using the hair dryer to shrink the film do not hold it too close. If the film shrinks too much it will pull the tape off of the trim.
Sealing up the windows for winter is a great way to make your living space more comfortable and cut down on your heating costs. That cold, harsh "Old Man Winter" will be here soon enough!
Wednesday, August 3, 2011
Controlling the Humidity Level in Your Home
Do you have a humidity problem in your home? How can you keep the humidity level at a comfortable level during these hot and humid summer days.

If it reads above 50% you should take steps to reduce the moisture content in your home to keep mold, mildew and the attraction of pests down in your living space.
Here are a few tips:
Run the bath vent fan during a bath or shower then for 20 minutes after
Grill out more and boil noodles and other food items on the grill.
Keep the toilet lids down (GUYS!!!)
Be sure the downspouts direct the water a minimum of 4-6 ft away from the foundation
Crack a window in the basement
Install a humidity-ridding device such as a dehumidifier, Humidex or Easy-Breathe type systems
Keep the AC turned down to the desired temp, do not bump it up and down. Your AC system does a great job of removing humidity from the home but only when it is running!
Place large plants outdoors if possible, if not water them sparingly.
If you have a sidewalk or patio right up against the foundation, be sure the crack between them is completely sealed.
Remember a home that is too wet — where the humidity is greater than 50% — can be a breeding ground for mold, rot, pests such as termites and cockroaches, and condensation. It can cause health problems for you and your family, pets included. Keep it under control by implementing these tips and observe your humidistat daily to see how you are doing.
Wednesday, May 25, 2011
Home Elecrtical Concerns
Here is how you know you need an electrician to visit your home
If you have one or more outlets that have loose prongs. They will be outlets that when you plug in your appliance the plug does not want to stay in the outlet, it droops or falls out.
If you have a light switch that arcs when it is turned on. Sometimes it may spark and sometimes it will make an arcing sound. Too much build-up of carbon can lead to resistance in the switch and can cause overheating and possibly, fires.
If you have lights that dim when another appliance is turned on. An example may be when you run the microwave, vacuum cleaner or the air conditioning cycles on. If the lights dim there could be an overload, or low voltage on that circuit which could lead to shorter-lived equipment or appliances, light bulbs and possibly a fire.
If you have a light fixture that you consistently replace the bulbs more so than other fixtures. It could mean an under voltage situation or an overloaded circuit breaker.
 If you have a GFCI outlet in the house that keeps tripping, forcing you to reset it. GFCI outlets are the ones with the manual reset switch on the outlet itself. A GFCI outlet is required in bathrooms or in outlets where an appliance could come in contact with water. Others may be protected in the breaker box.
 If you have more than 2 extension cords currently in use in the home because you do not have enough outlets for all of the fixtures or appliances you wish to have.
If you have any outlets with a charred face or burnt-marks. It may end up only being cosmetic but it may be worth it to have it checked out.
If you have any wires that are sticking out from electrical boxes or cover plates. All wiring should be concealed in conduit, in the panel, or box or in the “romex” sheath (2 or more wires in a thin, white plastic covering in use in most homes today).
Tuesday, March 22, 2011
Garage Door Maintenance & Repairs
One of the most overlooked components of your home is the garage door. It usually operates flawlessly several times a day but when it gets neglected and sub sequentially fails it can interrupt your daily routine.
Because a garage door is a very large, heavy, moving part, it’s prone to fall out of adjustment with daily use. When this happens, the door becomes harder and harder to lift and lower.
A garage door looks rather simple but it has many moving parts that need yearly attention to keep it in great working order. The best way to prevent a failure and high repair costs is to inspect it every year for loose or worn hinges, springs, and other hardware and, when you notice a problem, address it immediately before it has a chance to deteriorate.
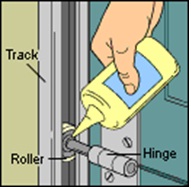 Then lubricate the moving parts. Apply penetrating oil to all rollers and hinges at least once a year. If you notice any loose screws, bolts, or nuts, tighten them so parts won’t fall out of adjustment.
A door that seems unusually heavy to lift may have a problem with spring tension. Garage door springs are under extreme tension because of the loads they must lift, and this makes them dangerous to adjust. If your door’s springs are out of adjustment, do not attempt to work on them yourself. Call in a professional. If the door seems to bind in the tracks an adjustment and maintenance may be all that is needed. If it sags in the middle when opening or once it is fully open it may need a few bracing members.
With proper care and maintenance a quality garage door should last 30-40 years. The key to this longevity and lowest cost benefit is to spend about an hour a year on the maintenance if you can do it yourself or $100-$130 to have a professional service it. Again, spend hundred$ now in maintenance or thou$and$ later in repairs (or replacement). An average mid-grade replacement double wide door will run around $1800-$2700 installed.
Tuesday, February 22, 2011
Storage 'Stuff"
Spring cleaning is right around the corner. If you are like most Americans you have accumulated quite a lot of “stuff” over the winter months and the holidays. The newer, shinier and sleeker stuff probably has displaced the older, yet still good “stuff” that you are still very fond of and are not quite ready to ship out or get rid of.

When it is all said and done we Americans accumulate a lot of “stuff.” Our homes can only handle a fixed amount of this “stuff” before it becomes a mess or potentially a fire hazard. We like our “stuff” and we hesitantly get rid of it. Cyndy Salzmann, 'The Clutter Coach,' states “If you don’t love it or use it….lose it!” But let’s face it; we seem to love all of our “stuff.”
The good news is that as we accumulate all of our “stuff” we can live out our normal, structured lives if we learn to keep our “stuff” somewhat organized.
The two most popular and least costly means to add structure to the mounds of “stuff” are to add storage shelving and/or storage shed. Many will opt for the rented storage units instead of building or purchasing an on-premise storage shed but the concept is the same, it’s just a convenience and cost issue.
 Adding that extra storage space could be as easy as purchasing and installing a heavy-duty shelving unit or having one custom tailored for a particular spot in the basement or garage. The pull-down attic ladder with planking and shelving installed in that unused area is the most requested storage option we have accomplished. The long-term costs are favorable compared to renting an off-premise storage unit. Oh, and maybe some focus on pairing down on how much “stuff” we think we need to retain.
Thursday, February 10, 2011
Prepare for the spring melt down
We've had quite a bit of snow this winter and a possibility of more on the way between now and spring. With the potential for a lot of moisture soaking into the ground around your home a wet basement is the last thing you will want to complicate your life.
 wner can accomplish to prepare for the melting snow is to ensure their sump pump is operational. A sump pump is normally located in a "sump pit." This is usually in the basement under a round plastic lid and has an electrical cord and a drain pipe routing through it (if a pump is installed). The purpose of the pump/pit is to collect water that normally would enter the basement and pump it out to a location in the yard keeping moisture out of the basement. Not all homes have a sump pump though.
Wednesday, January 12, 2011
Preventing Ice Dams
 BULLETIN: MORE SNOW ON THE WAY!
Extensive damage can happen in homes if ice damming occurs. Replacement of ceilings, walls and insulation can be very costly alone without considering carpeting, wood floors, furniture etc. Insurance will probably cover some of these costs but deductibles, replacement time, time off work, coordination hassles etc. will make it well worth the expense to prevent ice damming in the first place.
Fresh snow can be pulled off the edges of the roof with a roof rake, or snow rake. They are available at some of the local hardware stores. I have never found one at any of the "big-box" stores, but if the need is there I would not be surprised if they started carrying them. If you wait several days before you attempt to pull the snow off with a snow-rake you may have a more difficult time ahead of you. The snow may build up ice crystals and be very tough to remove.
With the expected accumulation of more snow the rest of the winter I would highly advise you MAKE THIS A HIGH PRIORITY! The added weight of all that snow on a roof can cause a collapse let alone water leaking into the ceiling and walls. This amount of snow this early in the winter could be still on the ground (and roof) until April.
PANTY-HOSE TRICK
If you have some old panty hose laying around the house you could fill them with "Ice Melt" (must be calcium chloride, not rock salt) and lay them vertical on the ice dam. The point is to make several vertical breaks through the ice dam so melted snow has a place to drain off the roof. This is a great trick but the best overall method is to remove the loose snow right away.
 wire is attached to the lower sections of the roof and is manually plugged-in or turned-on by the home owner to heat up that part of the roof to melt off the ice and snow. These are somewhat inexpensive (relative to costly repairs or your insurance deductible) but should only be used as a last resort in correcting the ice dam problem. The heated wire does not have a long life and the underlying issue causing the ice damming is still unsolved. I would only recommend using heat tape if all other methods of correction have been used and the issue is still not solved for a particular problem area (may be related to tree cover, shading, wind direction, etc.)
Saturday, January 8, 2011
Ten Things Every Homeowner Should Know

3. Electric Box Breaker Switches - Be sure everyone in the home knows the location of the electric panel. Each breaker should be labeled for efficiency and safety. This will save you frustration and time during electrical issues.
4. Repair water leaks ASAP - A huge percentage of home repair costs involves water damage. Once you have detected a water leak have it repaired immediately. The longer you let it continue the more dollars required for the repair.
5. Foundation Blocks and Concrete Slabs - One of the most costly home repairs is leveling the house. To help avoid this costly repair you should keep the slab nourished during spells of very dry weather. Install flowerbeds along the sides and keep them moist. If you have no flowerbeds then you should actually water the edges of the slab. Do not over water...just be aware that cracks in the dirt can be a sign of future problems in your home's foundation.
6. Install Gutters/Downspouts - Water should be directed away (4-6 ft) from the foundation, sidewalks or patio/driveway slabs. Just like too much dry weather is bad for your foundation...too much water is bad also. Never let water pool at base of house.
Wednesday, October 20, 2010
Keep the Chill OUT!

 or.
or.
Wednesday, September 29, 2010
Don't Let the Bed Bugs Bite!
 Bed bugs. I used to laugh and joke about them as a kid but I never had any experience with them, nor had any of my family or friends knowingly had them.
They are real, they are a nuisance, they DO BITE, and they are a bugger to get rid of.
Most folks will revert to the professionals, an exterminator or try to DIY with some chemicals from one of the big-box stores. I have another solution that is very effective and very safe. The ONLY precaution is breathing of the dust when applying. It is Diatomaceous Earth, or DE. It can be purchased at any local health food store and is fairly inexpensive. There is no chemical smell and it is an all-natural "green" product.
Wear a dust mask and apply a ring around your bedposts, in any wall or floor cracks near your bed and dust along the decorative piping at the edges of your mattress. The DE will cut these little critters each time they crawl through the fine powder and they will eventually dry-up and die. You can put it down as a precautionary measure as well.
If you have visitors for the upcoming holidays I would dust all areas where they could unknowingly bring these awful critters into your home. There are huge outbreaks in the Manhattan, Chicago, Denver and Detroit areas as well as others.
If you travel and stay in a hotel I would take some precautions to ensure you do not pick up a hitchhiker. Inspect the bed you will lay your head down on. Keep your suitcase on the countertops or table tops and vacuum it when you return. I would put out the DE just to be safe.

Bed bugs are not known to carry diseases but they can leave you with some itchy welts and a lot of headaches. It is best to pre-treat with the safe DE and hopefully they never come for a visit.



